What Is a Step and Repeat Banner? Uses, Sizes, and Setup Explained
You've seen them hundreds of times without necessarily knowing what they're called. The wall of repeating logos behind celebrities at award shows. The branded backdrop at a charity gala where guests line up to take photos. The sponsor display at a product launch where the CEO stands smiling for press shots.
That's a step and repeat banner. And while they started as a Hollywood red carpet fixture, they've become one of the most practical and widely used display formats across corporate events, sports sponsorships, weddings, and brand activations of every size.
If you're planning an event and someone mentions you need one - or you've been tasked with ordering signage and aren't sure what this format actually involves - this guide covers everything that matters: what they are, why they work, what sizes make sense for different situations, and how setup actually goes.
What a Step and Repeat Banner Actually Is
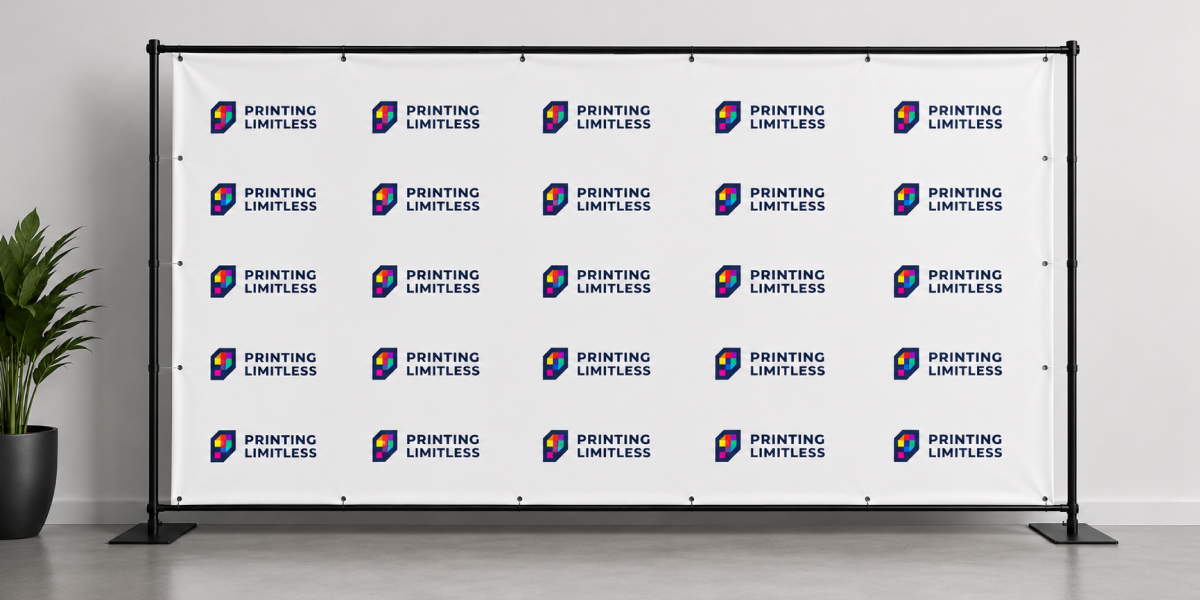
The name describes the design method, not some complicated printing process. A pattern - usually logos, brand marks, or event names - gets repeated across the entire surface of the banner in a diagonal or staggered grid. Every time a guest poses in front of it and a photo gets taken, some version of that logo appears in the frame. Step, repeat. Step, repeat.
The result is a photo backdrop that doubles as a branding surface. It doesn't matter exactly where someone stands or how the photographer frames the shot - the logos show up. That's the whole point.
The banner itself is typically a large vertical or horizontal display surface mounted on a freestanding frame. The graphic fills the full surface edge to edge, with no gaps or plain borders, so the backdrop looks intentional and polished in photos.
What makes step and repeat banners different from other large-format displays is their specific purpose. They're designed for photography. Every decision - the size, the logo scale, the color contrast, the frame height - feeds into how the final photos look. A banner that works beautifully in person can still produce cluttered, unreadable results in a photograph if the design proportions are off.
Where They Actually Get Used
The red carpet version is the most famous, but step and repeats show up in a wider range of settings than most people realize.
Corporate events and conferences use them at entrances, speaker areas, and award presentations. A company hosting its annual sales conference might set one up at registration so attendees can take arrival photos for social media - which also extends the brand's reach beyond the room.
Product launches and brand activations almost always include one as a photo opportunity station. When a brand wants press coverage, they need a controlled backdrop that ensures their name appears in every image that gets published.
Charity galas and fundraisers use them to recognize sponsors. The sponsor logos appear in the step and repeat design, so every photo taken at the event gives those brands visibility. It's a form of sponsorship fulfillment that actually produces tangible, shareable results.
Weddings and social events have adopted the format as a guest photo experience. A couple's monogram or event name repeating across a backdrop creates a photo station that drives social sharing - and looks far more deliberate than a plain wall.
Sports events and team banners use them at press conferences, award ceremonies, and pre-game media areas. The league logo, team logo, and sponsor marks all share the backdrop, and every press photo taken carries all three.
Trade shows and exhibitions sometimes use them at booth entrances or dedicated selfie zones to create organic social media content from event attendees.
The common thread across all of these is the photo opportunity. Anywhere people are likely to be photographed - formally or informally - a step and repeat turns that moment into a branding moment.
Standard Sizes and What They're Each Good For
Size selection comes down to two things: how many people will stand in front of it at once, and what the surrounding space looks like.
4 feet × 8 feet is the smallest end of the typical range. It works for a single person standing center frame - tight, portrait-style shots. Suitable for smaller venues, one-person interview setups, or situations where space is limited. Not ideal for group photos of more than two people.
6 feet × 8 feet is a step up that works comfortably for two to three people. Many smaller corporate events and social celebrations use this size because it's manageable to transport and set up but still looks substantial in photos.
8 feet × 8 feet is probably the most common size across the board. It accommodates groups of three to four comfortably, works in most standard venue spaces, and photographs well without requiring a wide-angle lens. If someone says "get a step and repeat" without specifying dimensions, this is a safe default.
8 feet × 10 feet gives more horizontal room for larger groups and is common at trade shows and mid-size corporate events where five or six people might stand together for a team photo.
10 feet × 8 feet - or variations around that footprint - is where things start to feel genuinely large. This is the format for 10ft step and repeat banners that you'll see at sizable galas, press junkets, and red carpet-style arrivals. The extra width allows for wider group shots and creates more visual impact from a distance. It's also the size that starts to look like "the real thing" in photos.
Larger custom sizes go up from there - 12 feet, 16 feet, and wider for major corporate events, conventions, and televised press events. At that scale, the banner itself becomes part of the set design rather than just a backdrop.
One thing worth knowing: the size of the banner affects the scale of the logos within it. A design that looks well-proportioned on an 8×8 might have logos that read as too small or too large on a 10×10. Good print providers will adjust logo sizing relative to the total surface area, but it's worth confirming this rather than assuming the same file scales cleanly to any size.
How the Design Actually Works
The repeating pattern is created during the design phase, not during printing. A designer takes the logos and brand marks that need to appear and tiles them across the full banner dimensions - usually in a diagonal, staggered layout so the pattern doesn't create harsh horizontal or vertical lines in photos.
A few things that experienced designers get right that first-timers often miss:
Logo size relative to human scale. When a person stands in front of the banner, their torso will cover some of the logos. The logos need to be large enough to be clearly readable in the remaining visible space - above the shoulders, to the sides. Too small and they become visual noise. Too large and only one or two appear in frame, which makes the repetition less consistent.
Color contrast between logos and background. Dark logos on a dark background, or light logos on a white background, tend to disappear in photographs - especially in mixed lighting. The backdrop color and logo colors need enough contrast to remain legible in both bright and dim venue lighting.
Spacing between logo repetitions. Too tight and the pattern looks cluttered. Too spread out and a single frame might only capture one logo. A diagonal offset grid with moderate spacing tends to photograph best.
File format and resolution. Banner printing requires high resolution files - typically vector formats (AI, EPS, PDF) or high-resolution raster files at 150–300 DPI at actual print size. Sending a small JPEG won't produce a sharp result at 8 or 10 feet wide.
If you're working with a print provider who does events regularly, they'll often have a design template for the specific size you're ordering. It's worth asking rather than starting from scratch.
The Step and Repeat Banner Stand: What It Is and Why It Matters
The banner is one part of the equation. What holds it up is the other part - and it matters more than people tend to think until they're standing in a venue trying to get things together an hour before guests arrive.
A step and repeat banner stand is a freestanding adjustable frame, typically made from aluminum tubing, that the banner mounts onto. The banner attaches to the frame along the top and sides - sometimes with pole pockets sewn into the banner, sometimes with clips or a tension system depending on the frame design.
Most stands break down into sections for transport and pack into a carry bag. Setup involves connecting the tubing sections, adjusting the frame to the banner's dimensions, and attaching the banner. A two-person setup for a standard 8×8 takes maybe 15 to 20 minutes. Alone, it's doable but awkward at the wider sizes.
The stand system determines a few important things:
Portability. Tube-and-connector systems are lighter and easier to pack but require more assembly steps. Pop-up tension fabric systems are faster to deploy but bulkier to transport. If your event involves transporting the display across multiple venues or locations, the packing size and weight of the stand matters as much as the banner itself.
Stability. A banner at 8 or 10 feet wide has real surface area. In a room with air conditioning airflow or near an exterior door, a light stand can shift or tip. Most quality stands include stabilizer feet and sometimes ground stakes for outdoor use. Check whether the stand you're ordering has these - it's not something you want to discover is missing when you're on-site.
Adjustability. Most stands accommodate a range of banner widths and heights rather than being fixed to one size. This is useful if you plan to reuse the hardware with differently sized banners for different events.
Print attachment method. Some stands use pole pocket attachment - a sewn sleeve along the top and bottom of the banner that slides onto a horizontal bar. Others use a clamp system. The attachment method needs to match how the banner is finished (hemmed edges, pole pockets, grommets), so confirm this when ordering both the banner and the stand together.
Ordering the banner and stand together from the same provider is generally the simplest approach - everything is confirmed to be compatible and usually ships together. Mixing a banner from one source with a stand from another can create mismatch problems with sizing and attachment.
Outdoor vs. Indoor Use
Most step and repeats are designed for indoor use - controlled lighting, no wind, predictable conditions. But outdoor installations do happen, particularly at outdoor galas, festival entrances, and sports venues.
Outdoors, a few things change:
Wind load is the main concern. A large, solid-surface banner in any kind of breeze becomes a sail. Outdoor step and repeat setups need weighted base feet, staking options if the ground allows, and ideally some wind venting - either mesh material panels or a design that uses a mesh substrate rather than solid vinyl. For very windy locations, a mesh substrate that allows some airflow through the banner face is far more stable than solid material, though it will print slightly less crisply.
Lighting is harder to predict outdoors. The consistent lighting that makes indoor step and repeat photos look polished - a photographer's flash against a controlled backdrop - becomes variable sunlight, shadows, and glare outdoors. This isn't a banner design issue so much as a photography consideration, but it's worth factoring in when choosing a location for the backdrop.
Sun exposure affects material longevity. If a banner will be outdoors for an extended period, UV-resistant inks and materials matter. A banner made for a single outdoor event is a different spec than one intended for repeated outdoor installations.
Ordering Timeline: How Far in Advance You Actually Need to Plan
This is where a lot of first-time event planners get caught. A step and repeat banner looks simple, but there are several steps between "we need a backdrop" and "the backdrop is installed and ready."
Design approval alone can take several rounds - especially when multiple sponsors or stakeholders need to sign off on logo placement. Budget time for at least two or three revision cycles before files are finalized for print.
Production time at most quality print providers runs three to five business days for standard orders after files are approved. Rush options exist but typically add cost.
Shipping adds time on top of production, particularly for large items. An 8×8 banner and stand ship as oversize freight in many cases, which means standard ground shipping times apply - not next-day envelope delivery.
A realistic planning timeline for a first-time order: finalize the design two weeks before the event, approve files at least ten business days out, and confirm delivery address and timeline with the provider. That buffer absorbs the revision cycles and shipping variability without creating a crisis.
For repeat orders where files are already approved and on file, the timeline compresses significantly.
A Few Things Worth Confirming Before You Place the Order
Does the price include the stand? Some listings show banner pricing and stand pricing separately. Others bundle them. Confirm what's included so there's no surprise when the package arrives.
What file format does the provider need? Don't assume JPEG is fine for a 10-foot wide banner. Ask for the exact file specifications - dimensions, resolution, color profile - before your designer finalizes the artwork.
How is the banner finished? Pole pockets, grommets, hemmed edges - the finishing needs to match the stand attachment system. Confirm both at the same time.
Is the stand height adjustable? If your venue has a lower ceiling or you're doing an outdoor installation with height restrictions, a fixed-height stand can be a problem. Most stands are adjustable, but verify.
What's the return or reorder policy? For events that recur annually, you'll likely want to reorder with the same or updated design. Some providers store your files and make reordering straightforward. Others don't. Worth knowing upfront.
The Practical Reality of Using One
Step and repeat banners are one of those event elements that look high-end but are actually fairly manageable to execute once you've done it once. The banner goes up in under thirty minutes with two people. It photographs well almost automatically if the design is solid. And when guests or press stand in front of it, the result looks polished - which is the entire point.
The most common mistake is underestimating how much space the setup needs. An 8×8 banner needs roughly 10 feet of clear space in front of it for a photographer to frame a proper shot with some breathing room. Pushing a backdrop into a corner and expecting good photos is a setup for frustration. Think about the full photography zone - backdrop plus standing space plus camera distance - when you're choosing placement in a venue.
The second most common mistake is waiting too long to start the design process. The banner itself prints quickly. Getting stakeholder sign-off on logo placement and spacing is what takes time, and that can't be rushed without consequences.
Everything else is fairly forgiving. The format works at most price points and venue sizes. It doesn't require professional installation. And a well-made one can be stored and reused for multiple events if it's handled carefully and stored flat or rolled rather than folded.